
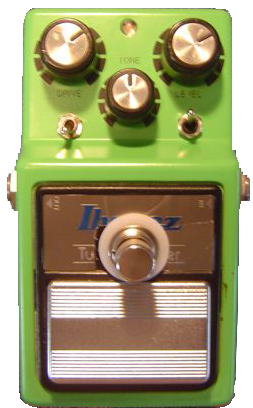
 For all mods, prep the enclosure by drilling out the necessary hole. Here, I have 3 holes - two small ones for the Bass Boost and Distortion switches and a huge 3/4" hole for the heavy duty footswitch (level bypass mod).
You will need to take time and measure out the distances you need using the existing components (like the pots) to figure out how much room you have to work with. Measure twice and drill once because this is the only enclosure you get.
The Schematic The schematic to the left show the mod. Click the picture to enlarge if you need to. The mod is to wire a cap in parallel with the 0.047uF one. The switch puts the two caps in parallel in one position. The other side of the switch is disconnected so the cap is out of the circuit and the tubescreamer is operating in factory mode again. The schematic to the left show the mod. Click the picture to enlarge if you need to. The mod is to wire a cap in parallel with the 0.047uF one. The switch puts the two caps in parallel in one position. The other side of the switch is disconnected so the cap is out of the circuit and the tubescreamer is operating in factory mode again. | |
Step 1: Locate the 0.047uF Cap and wire across it  The 0.047uF cap is located near the op-amp. It is the only 0.047uF cap close to the op-amp and may be marked 473k or the like. It is the little yellow cap here wit the two blue wired on either side of it. The 0.047uF cap is located near the op-amp. It is the only 0.047uF cap close to the op-amp and may be marked 473k or the like. It is the little yellow cap here wit the two blue wired on either side of it.It is better to do this from the component side of the PCB because of the orientation of the board when it is replaced. You can use the other side, but you will need much longer wires and your harness may get more complex. Connect the 0.22uF cap to one side of the capacitor and use heat shrink tubing to insulate the leads. | |
STEP 2: Wire the switch in series  Wire the switch in series with the other leg of the 0.22uF capacitor. Wire the switch in series with the other leg of the 0.22uF capacitor. | |
STEP 3: Mount the Switch  NOTE: This should be the last step in all the mods. If you want to do other mods, stop here and finish the rest. The reason is that once you start wiring the switches in place, things will get very tight with space and you won't have room to do the other mods. NOTE: This should be the last step in all the mods. If you want to do other mods, stop here and finish the rest. The reason is that once you start wiring the switches in place, things will get very tight with space and you won't have room to do the other mods.If you are ready to mount the switches, this figure shows the location of the Bass Boost switch, just under the Drive control. You can just see the two blue wires which attach to the switch. | |
 This shows the same Bass Boost switch from the other side. In this photo you can clearly see the two blue wires to the switch as well as the new 0.22uF cap (green) which is resting in place, about where it will be once the PCB is back in place. Remember to insulate the leads and take care with the installation of the switch and location of the cap once the PCB is back in place. This shows the same Bass Boost switch from the other side. In this photo you can clearly see the two blue wires to the switch as well as the new 0.22uF cap (green) which is resting in place, about where it will be once the PCB is back in place. Remember to insulate the leads and take care with the installation of the switch and location of the cap once the PCB is back in place.Test it out - the bass boost is clearly audible and adds more girth to the low end of the screamer. |


on the .22uf Cap does it matter what kind you use? Ceramic, Foil etc?
ReplyDeletefoil is always better :)
ReplyDeleteTantulum will work. Best to grab some caps in that .xx uf range to play though. I found .47 too subtle, .63 still not enough. Have .63 and .22 parallel for a final of .893uf and finally got some rumble back from the stock setting. Might tinker .63 and .47 or even all 3 another day, but more capacitance reduces the overdrive effect.
ReplyDeleteThank you for sharing this information, Its has help me to know more about Increase PC Volume
ReplyDeleteI have replaced this cap with a higher quality 0.1uf and have no need to go back to a thinner sound! I really wouldn’t bother with the switch.
ReplyDeleteHey, just curious, did you mean you replaced the stock 0.047uf cap for a 0.1uf, or that you used a 0.1uf instead of the .22uf that the mod generally uses?
Delete